Friday, March 2, 2012


I just had a chance to get into the shop for a little more work on the b-17 Cadillac. I decided to keep on working on the main body so I know what I’m dealing with once it comes time to do the detail and trim work. Sometimes that stuff can be a problem if I don’t get a head start on the planning process. The next hurdle in the body work was the hoods and the new intake and tunnel I’d need to accommodate the Allison motor.
I knew I would have to vac form a piece because the hood will be able to open, no cheating for me this time. I started with the rough dimensions of my scoop, like where the carbs are and the overall size. I then took a piece of ¼ inch Sntra (pvc board) and cut and shaped it to be the new piece. Sintra works great for this stuff, it will handle the vac pressure without distorting and it is easy to shape. After it was done I loaded it into my Mattel Vac former machine and pulled a few shapes. It was a tight fit on the vac bed but I got a few good ones made.
Then to rough the scoop in, I took a pencil and traced a “hull line” around the vac part and proceeded to cut out my new hood scoop. In the top picture you can see a line of blue tape extending to the front of the hood that will be a cut out that flows into the opening giving the scoop a little more “purpose”. You can also see that I cut out the front grill to make it super aggressive, I’ll load a bunch of custom radiators behind the opening…SWEET!


Tuesday, February 21, 2012


My love affair with cheap spray paint has spanned my modeling history. I’ve always been a fan of the big rattle cans, not the tiny hobby ones, but the monster Home Depot size. I have dozens of cans in the shop and use them regularly, but my go too can is always the super cheap flat black. I don’t know when my reliance on this stuff became real, but I know that when I can’t find it and I start getting low I genuinely start to panic.

I mainly use it as a primer for all my models. I discovered early on that flat black shows flaws WAY better than standard grey or white. Just a quick glance along a car body or custom made part with the shop lights behind it can turn microscopic divots into craters, and can magnify the smallest flaw. After the flaws are picked out the cheap flat paint is a cinch to sand off to reveal the contours and problems, it has NEVER clogged sandpaper or started to peal up, and the fairing is down to the nanometer.

The can on the left is from Walmart (I think) it is the last of that brand in the shop for now. I find it to be the best one there is. It dries in a few minutes and can be sanded right away, and once you get a light coat down as a base, you can lay it on thick and then it acts as a scratch and pit filler. The can on the right is the 99 cent stuff from Home Depot, it’s good, but it takes a little longer to dry and has a little more sheen to it which makes it inferior to the Walmart stuff for “proofing” contours.

The Cadillac body is getting the final coats and is almost flawless. I’ll end up sanding this coat almost completely off and that will reveal how I’m doing, and if it’s still not perfect then I can just blast it again and start over.

Wednesday, February 15, 2012


A little over a week into the project and I’d say it’s coming along well. I haven’t hit a wall of frustration that usually grinds something like this to a halt. The body has needed a few structural upgrades so it can be mated with the chassis without cracking along the seams. I decided to add a roof from the hardtop version of the kit (another $25 into the model!), but I needed a second kit anyway to do the split hood conversion. The suspension is dialed in and the wheels all fit, however around the rear suspension the frame rails get a little wonky, I’ll have to see if I want to build to model car show specs, or will just leave it alone.

I had to add some major supports to the rear window frame because the real car had the flimsiest of roof mounts! I mean if this car went over in real life it’d be like you would have 4 chrome plated BBQ skewers to keep the car from crushing you. I think the swoop and contour that I added work well with the body and add a nice dynamic to the rear.

The hood is going to need a scoop in the front and a tunnel all the way back to make room for the motor, I was trying to stuff it all under the stock hood but it’s a no-go…I think the hood bumps can break up the monotony of the "dual hood" well, it’s not a problem, but a challenge to make it look good.

The motor has mounts and can now be built up. I started with the intake manifold, all 8 pieces of it! I gave it a sand cast finish so it looks like an aluminum part, with a little detail and some plumbing it should look very nice.

The overall paint finish has been figured out with the creative input from a fellow modeler, thanks Robb!...anyway it's going to be natural metal up to the body line you can see in the pictures, then a nice faded OD top with a black anti glare hood. I think I'm going to do some rivit work arond the panels to make them look extra bomber-like.

I’m trying to get 2 hours a day in on this build, so far my wife has been OK with that, we’ll see how long it holds out.


Wednesday, February 8, 2012


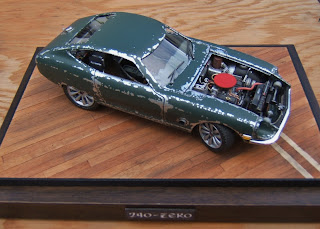
This car was the second in my WWII show rod mash up series. I took the Hasegawa 240 Z and turned it into a Japanese fighter. The body was contoured and the roof line changed. The rear wheels were huge and had to be tubbed in. This one sports the twin turbo V-8 from the Knight Rider KITT model. It allowed me to run the exhaust into some can mufflers mounted to the fender wall and then out the side of the body. The engine is super detailed and has every wire and hose it would need, I even scratch built a hood release mechanism. The interior is decked out with a samurai sword shifter and e brake handle, and the headliner is a rising sun battle flag. The fuel tank is in the back, plumbed and fitted. The license plate on this one reads “DVINWND”, and is mounted to the rear with a cool drilled out bracket. I incorporated two huge air horns behind the grill as an inside joke…like the car would creep up on you and surprise you with a blast! (Pearl Harbor humor is not funny but I liked the touch).

As you can see the paint is a little strange. It simulates the pealing and chipping the IJN fighters showed in the war. I painted the whole car body with aluminum metalizer paint then sprayed over that a coat of IJN aircraft green, I then hand-picked the paint off with a #11. It was finished with the ID yellow chin patch and some exhaust smoke from the pipes. The glass is all custom made because the body shape was too altered to use the kit glass.

The base is meant to simulate the wood of a carrier deck, complete with trap door panel and some Japanese writing.


Here is the car that started me back on the road to car modeling. The Britsh Bomber started as a Tamiya Jag Mk. II saloon that I bought years ago. I mashed it with the AMT Woody Wagon and gave it a RAF colour scheme. You can see it went from a four door to two, chopped and raked. It had a LT1 engine stuffed in and has some serious rear wheels. Some of the super detail work includes a flight scarf on the hood mascot, tons of engine wires and lines, and check out the side pipes with the crosshairs and ignitor tips. The yellow British license plate reads "DAMBUSTR". It sports flawless black and green paint, that won "Best Finish" at the IPMS Seattle show a few years back.

I still love this one but it might go on Ebay soon...lots of crap models get good money, so why not a good one.


Here are some photos from day 3 of the Monster Caddy project. I have a second car on order so I can add another hood to cover the gap and go with a modified hard top instead of the soft one that came with my pink kit. Tomorrow I will finish the engine mounts get the rear suspension set up, and if I have a chance start to superdetail the engine and firewall.
I think I'll go with 4 pipes on each side coming out of the side fenders, because I love the idea of soot and exhaust down the side, like the real planes have on their wings. That will leave a lot of room in the engine bay...I'll have to figure something out, perhaps some side mounted radiators?
I'm torn between a bare metal finish or faded OD green...time will tell.


Just started working on the latest Theme Rod build. I just can't shake the recent obsession with car models...DAMN! Anyway this one goes along with my other WWII mashups.I'm goilg to cram an Allison V-12 in a 1959 cadillac and give it the B-17 treatment. This one is a little harder than I thought ( arn't they all) but a few days in the shop and I have the chassis set up, the engine half built and the body restyled and shaped.

The hood on this thing is going to be in two parts opening from the center because it's super long (scale 10 feet!). The trunk is going to be all fuel tank, and the car will only seat two! Of course it will be in WWII colors and mildly weathered with MIG pigments and oils. These pics are just pulled from the web... I'll post my own later

Followers